
HDR Photography: What You Should Know And How To Shoot It.

Have you ever attempted to shoot a high-contrast scene only to be disappointed when the photos you took simply don’t do it justice? Don’t be alarmed; it’s not you or your camera. Even when the exposure is correct, some situations will always have blown-out lights, dull shadows, or both. Even though finding a middle ground in these instances is practically difficult, there is a way. This age-old quandary can be resolved thanks to the wonders of HDR processing. What exactly is HDR photography? Here’s a brief summary of what it’s about and how it is used by Mohit Bansal Chandigarh.
What Does HDR Photography Mean?

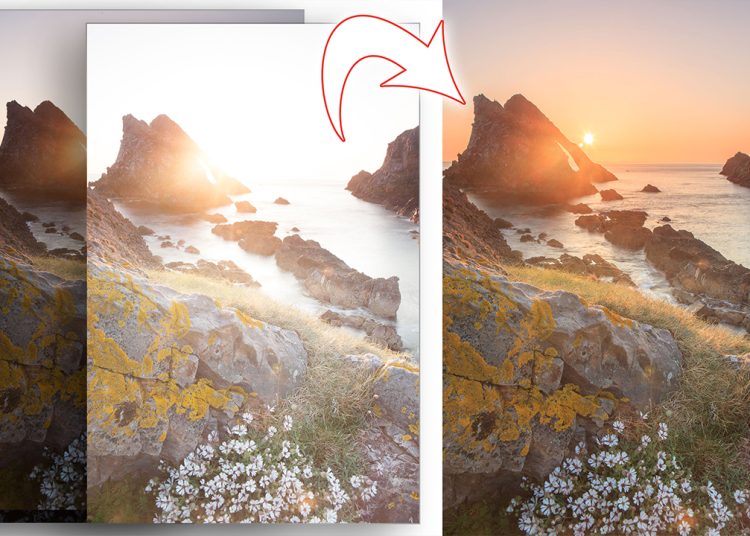
High Dynamic Range (HDR) photography is the technique of merging many photographs to create one image. The approach entails shooting several photographs and then sewing them together. Each picture depicts the scenario at various exposures. When the images are combined, the overall exposure is right. In most circumstances, at least three photos are required for this operation. The first is to obtain a mid-range exposure photo, while the second and third meters for highlights and shadows. You may snap as many pictures as you like as long as the total is divisible by three (excluding your mid-range exposure). On the Exposure Value Meter, these photographs appear either as a negative or a plus. +3 and -3 are common choices.

Another way to look at HDR is as follows: HDR is an abbreviation for “high dynamic range.” Photographers use this approach to balance the light levels in a picture. It is often employed when there are large changes in exposure within a single frame. Indoors, shooting through a window to a place with direct sunshine is a common example of such a setup. A camera will either under-expose the interior or over-expose the exterior in this instance. A photographer must take many images in various exposure settings. Some images should be darker to reduce highlights, while others should be brighter to bring out detail in the shadows. These photographs are then combined using specialist software, which extracts all conceivable information and combines it into a single image with better-balanced exposure throughout the spectrum. The ultimate result is a breathtaking visual that nearly reflects how the human eye perceives a subject. This digital alteration procedure has sparked some controversy and discussion in the field of photography, particularly with photographs that are “over-cooked.” But one thing is certain: HDR is here to stay. When done correctly, this one-of-a-kind and in-depth processing approach may provide stunning pieces of art that replicate how humans see and recall a landscape or scenario.
What Will I Need To Create An HDR Photograph?

Those who wish to take their photography to the next dimension should learn how to manually create HDR images. This will allow you to catch more details and edit the picture to your taste. The finished result will always be superior to automated HDR.
- A digital camera or smartphone with manual mode – One must fully know how to shoot in manual mode.
- A tripod – The camera must be motionless. You don’t necessarily need to have one if you can accomplish it without using a tripod.
- A static or motionless subject
How to Create an HDR Image

Step 1: Take many images at various exposures.

The idea here is to shoot three separate exposures of the same image, with no movement between them. Your bracketed images will be separated by two stops. Manual or Aperture Priority mode is recommended, although Program mode is equally acceptable. Here’s what you should do:
- Locate a steady location for your gear and fasten it to it.
- Configure your cable release, mobile phone app, ir remote control, or self-timer.
- Set your focus and composition like you would for any other shot.
- Set up your camera as you would for a standard exposure and snap your first shot. Alternatively, if your camera supports Auto Exposure Bracketing, dial in your settings, fire off your series of images, and disregard the steps that follow (!).
- Take a second, brighter image to bring out the shadows. Turn the Exposure Compensation dial to +2 if you’re in Program or Aperture Priority mode. In Manual mode, half your shutter speed, then halve it again.
- Take a third, darker image to bring out the highlights. Turn the Exposure Compensation slider to -2 if you’re in Program or Aperture Priority mode. In Manual mode, double your shutter speed, then double it again.
- And there you have it! You have now three images with varying exposures.
Step 2. Combine Multiple Images Into One
- The aim is to combine (blend) the three separate exposures into a single ‘High Dynamic Range picture.
- Download a copy of Aurora HDR or any other software of your choice.
- Click “Open Image” from the Welcome screen.
- Navigate to the bracketed images on your hard disc, pick all three, then press the “Open” button.
- If you were shooting handheld, check the “Auto Alignment” box (and you may need to start the process again with this ticked if you find later that your images have not lined up correctly). If in doubt, turn it on.
- Select the little gear icon. If your snapshot includes subjects that may have moved somewhat between photos, such as tree branches swaying in the wind, check the “Ghost Reduction” box.
- Click the “Create HDR” button.
If you’re looking for a fun way to be creative with your camera and capture shots you couldn’t get any other way, consider trying out HDR photography. A high dynamic range (HDR) photograph is created by merging the best light from numerous exposures of a high contrast subject (often a landscape or cityscape). All you need to do is take your camera out of the case and start shooting. Now, get out there and take some photos of your own! Mohit Bansal Chandigarh is a renowned photographer and his article provides an overview of the HDR Photography.


